Quick Reference Guide for E-Verify Enrollment

Quick Reference Guide for E-Verify Enrollment | Current as of July 2018

1.0 Introduction
This guide is designed to assist you throughout the E-Verify enrollment and user registration process.
Using E-Verify is an important step in ensuring that your company has a legal workforce by electronically confirming the information on Form I-9, Employment Eligibility Verification, referred to hereafter as Form I-9.
E-Verify works by electronically comparing the information from an employee’s Form I 9 with records available to SSA and/or DHS to verify the identity and employment eligibility of each newly hired employee and/or employee assigned to a covered federal contract.
Employers can verify the employment eligibility of only one person at a time within E-Verify. All cases must be created individually.
E-Verify is free, and it is the best means available to confirm the employment eligibility of new hires. The E-Verify statute limits the scope of E-Verify operations to the United States, which includes the 50 states, the District of Columbia, Puerto Rico, the U.S. Virgin Islands, Guam, and the Commonwealth of the Northern Mariana Islands. Users may only create E-Verify cases in the United States.
NOTE: E-Verify Self Check, referred to as Self Check, is a free, fast, secure and voluntary online service that allows individuals to confirm their own employment eligibility themselves. Employers may not ask current or prospective employees to use Self Check to prove employment eligibility. The service is designed to provide visibility into government records, and if necessary, guidance on how individuals can correct those records. Self Check is separate from the E-Verify user interface. For more information and specific rules, visit https://www.e-verify.gov/mye-verify/self-check.
1.1 Company Enrollment
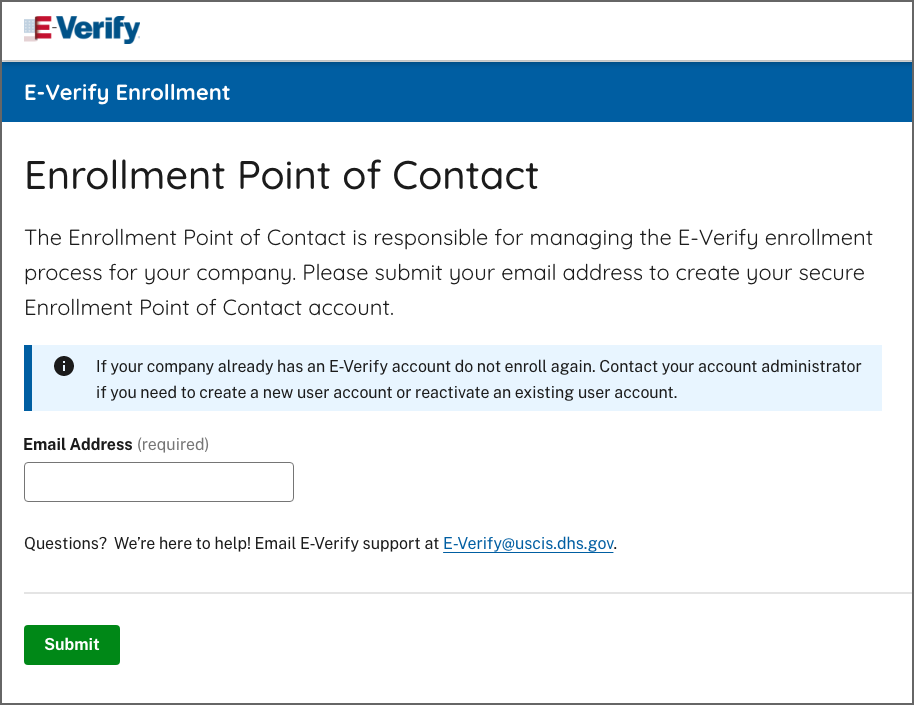
The Enrollment Point of Contact (POC) is responsible for managing the E-Verify enrollment process for your company.
Note: The Enrollment POC can only access E-Verify to complete a company enrollment.
Before you can start using E-Verify, you need to enroll your company. The term ‘company’ means any U.S. business, corporation, non-profit organization or government agency that is required to complete Form I-9.
Before you enroll, ensure that your company is not already enrolled in E-Verify. It is important that you do not enroll your company multiple times. If you attempt to enroll a company that is already enrolled in E-Verify, your enrollment will be delayed. Contact the E-Verify Contact Center at 888-464-4218 for assistance or questions in determining your company’s enrollment status.
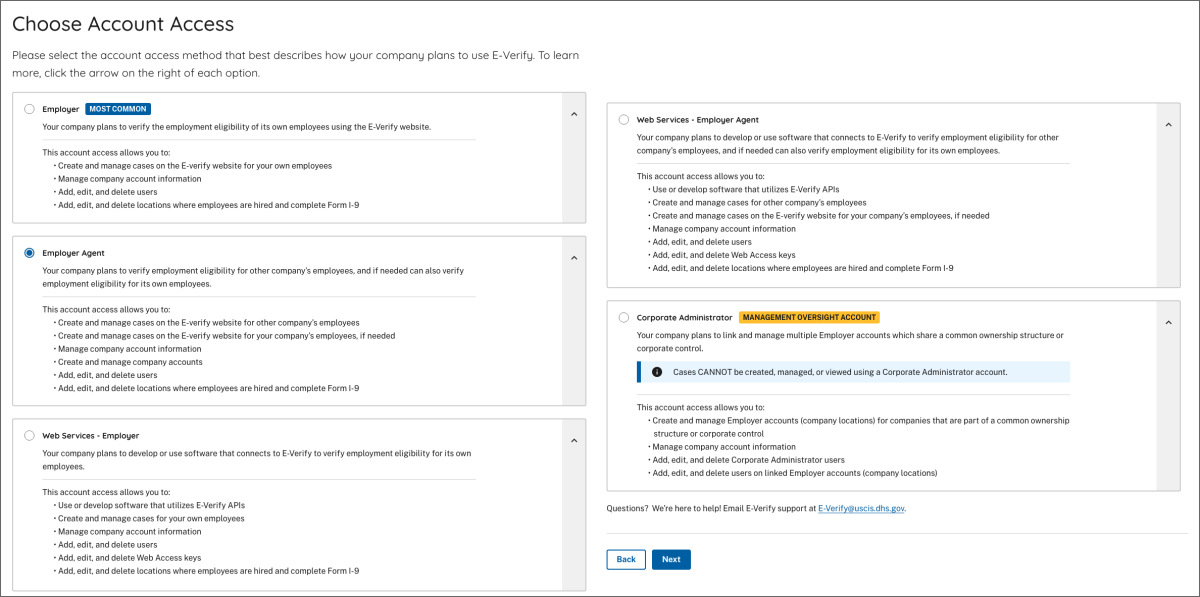
Companies may use E-Verify through an access method determined during the enrollment process. The four access methods include: employer, E-Verify employer agent, corporate administrator and Web services. The access methods are explained in the Access Method – Overview.
NOTE: For more information on corporate administrators, refer to Appendix A: Corporate Administrator Access.
ACCESS METHOD OVERVIEW
|
ACCESS METHOD |
EXPLANATION |
|---|---|
|
Employer Access |
Employer plans to use E-Verify to verify its employees This access method allows employers to create and manage their own cases directly in E-Verify. Most E-Verify participants, regardless of their business size or structure, are enrolled under the employer access method. |
|
E-Verify Employer Agent Access |
Employer agent plans to use E-Verify on behalf of its clients to verify the clients’ employees. The E-Verify employer agent access method allows an individual or company to act on behalf of other employers to create and manage the E-Verify cases of the other employers. The E-Verify employer agent may also create cases for its own employees. |
|
Corporate Administrator Access |
Employer has a central office that needs to manage E-Verify use for all of its locations that access E-Verify Corporate administrator access is used only to manage multiple employer accounts. Corporate administrators cannot create or manage individual E-Verify cases. |
|
Web Services Access for Employers -or- Web Services Access for E‑Verify Employer Agents |
Employer plans to develop its own software to access E-Verify The web services access method requires an employer to develop software that interfaces with E-Verify to create and manage cases. The employer’s software should extract data from its existing system or an electronic Form I-9 and transmit the information to E-Verify. Employers who choose this option receive a web services Interface Control Agreement (ICA) which contains the information used to develop and test the software interface. Both employers and E-Verify employer agents can use this access method. |
To determine how your company will use E-Verify, it is important you understand how your company processes its employees’ Forms I-9. Some things to consider include:
- Where do employees complete Form I-9?
- When do employees complete Form I-9?
- Does your company outsource Form I-9 processing?
- Does your company forward its Forms I-9 to a central location?
- Does each location where Form I-9 is completed have a computer with Internet access?
1.2 User Roles
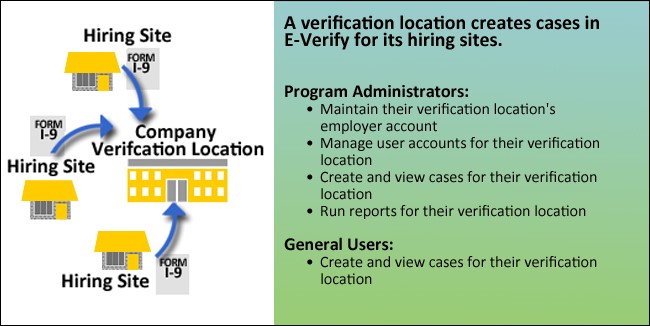
Enrolled employers can assign their users with different permissions and functions, depending upon the user’s role. There are two types of users: program administrators and general users. Program administrators provide support for the general user and manage the company profile. Employers are required to have at least one program administrator, and can have as many program administrators as they choose.
General users are only able to create and manage cases. Employers are not required to have general users, but can have as many general users as they choose.
General users and program administrators must successfully complete the online E-Verify tutorial before they can create or manage cases.
All registered E-Verify users must follow the guidelines set forth in the memorandum of understanding (MOU) and the rules and responsibilities outlined in the E-Verify User Manual located at www.E-Verify.gov and the E-Verify tutorial. It is your company’s responsibility to ensure that your users are prepared and capable of using E-Verify properly. Misuse of E-Verify may lead to legal liability for both the company and the user.
The User Role Overview explains the features of each user role. The corporate administrator user role is available only to companies that enroll in the corporate administrator access method. For more information on corporate administrators, refer to Appendix A: Corporate Administrator Access.
USER ROLE OVERVIEW
| User Role | Permissions |
|---|---|
| Program Administrator (at least one required) |
Every E-Verify account must have at least one program administrator. The program administrator is responsible for following all E-Verify program rules and staying informed of changes to E-Verify policies and procedures. Permissions include:
|
| General User (optional) |
Employers can have as many or no general users as they desire. The general user is responsible for following all E-Verify program rules and staying informed of changes to E-Verify policies and procedures. Permissions include:
|
1.3 Enrollment vs. Registration
Significant differences between enrollment and registration are outlined in the Enrollment vs. Registration Overview. For additional information on enrollment, visit https://www.e-verify.gov/employers/enrolling-in-e-verify.
ENROLLMENT VS. REGISTRATION OVERVIEW
|
|
ENROLLMENT |
REGISTRATION |
|---|---|---|
|
Who |
Enrollment Point of Contact enrolls companies in E-Verify to participate in the program. |
Program administrators register new users in E-Verify who are then able to create cases. |
|
How |
Visit the E-Verify enrollment website at https://e-verify.uscis.gov/enroll |
After completing the E-Verify tutorial and passing the knowledge test, program administrators may register general users and additional program administrators. For more information on adding new users, see Section 7.1 in the E-Verify Manual. |
|
Why |
Employers enroll to use E-Verify to confirm employment eligibility of employees |
Enrolled employers register users to create cases in E-Verify. There is no limit on the number of users an enrolled employer can register. |
1.4 Verification Locations and Hiring Sites
It is important to know the meaning of a verification location, a hiring site and the differences between the two. For a description of each, review the ‘Verification Location – Hiring Site – Overview.’
VERIFICATION LOCATION – HIRING SITE – OVERIVEW
- A verification location is where the employer’s staff takes the information from an employee’s Form I-9 and creates a case in E-Verify. Generally, each verification location has its own employer account. If the employer has staff at each location that uses E-Verify, then each location is considered a verification location. If the employer centralizes the use of E-Verify to certain locations, then only those locations are considered verification locations.
- A hiring site is the location where the employer hires employees and they complete Form I-9. If your company creates cases in E-Verify at the same location, it is a verification location and a hiring site. Employers select which sites participate in E-Verify on a hiring site by hiring site basis. This means that if you decide to have a hiring site participate in E-Verify, you must verify all newly hired employees for that hiring site. If you decide not to have a hiring site participate, you are not permitted to verify any employees at that location.
Example: Kevin owns a furniture store in Springfield. His employees complete their Forms I-9 at the store, and Kevin plans to use the computer at the store to use E-Verify.
In this case, Kevin will enroll in the E-Verify employer access method, and he has a single verification location and hiring site, both of which are the furniture store.
Example: Rebecca owns three restaurants, two in Georgia and one in Florida. In addition, Rebecca runs the business operations of these restaurants from a small office in Florida with its own staff. When her restaurant managers hire a new employee, the manager and the employee complete the Form I-9 on site at the restaurant. The manager then forwards the Form I-9 to Rebecca’s central office. Rebecca plans to have her office staff create the E-Verify cases.
In this case, Rebecca will enroll in the E-Verify employer access method and designate her central office as the verification location and the two restaurants in Georgia and two restaurants in Florida as hiring sites. (The central office counts as a hiring site because Rebecca hires staff members there as well.)
You may choose to use E-Verify throughout your company or limit your company’s participation to certain locations. While you are free to choose E-Verify participation on a site-by-site basis, your company must use E-Verify for all newly hired employees and employees assigned to a covered federal contract at each participating site. During enrollment, you’ll need to enter the number of hiring sites in each state that will participate in E-Verify.
2.0 Enrollment
2.1 Enrollment Checklist
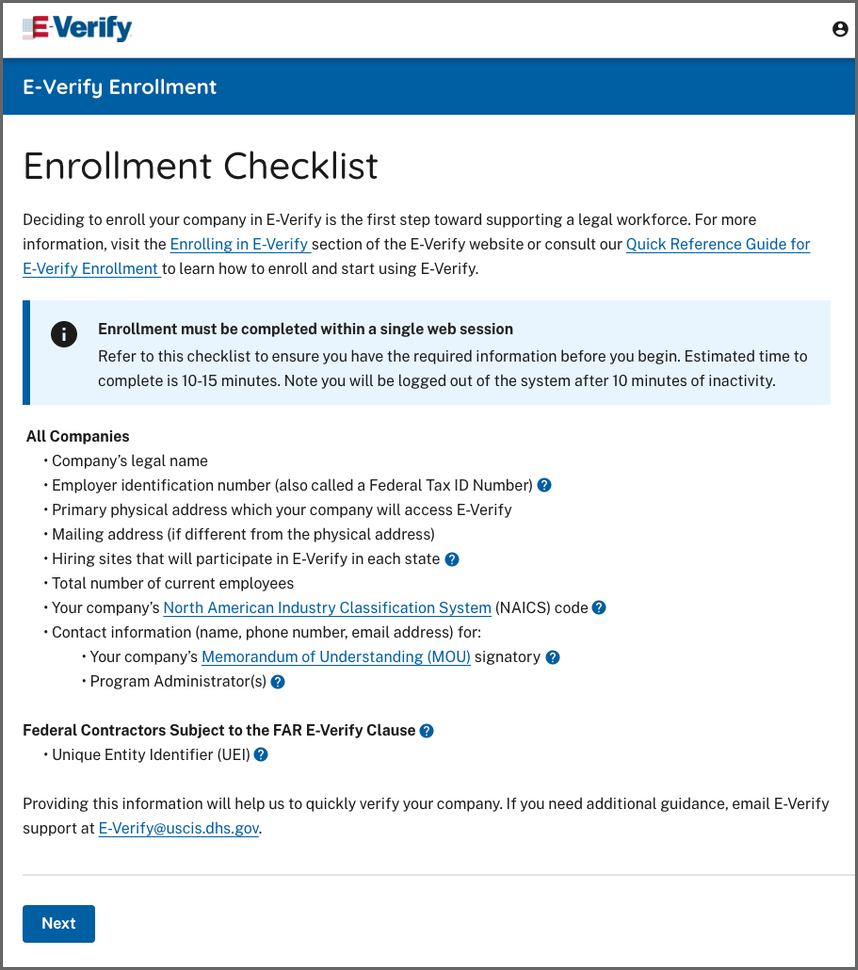
Deciding to enroll your company in E-Verify is the first step toward supporting a legal workforce. Visit the E-Verify Enrollment website at e-verify.gov/e-verify-enrollment to get started. E-Verify will guide you through the enrollment process by asking you several questions.
Enrollment must be completed within a single web session. Refer to this checklist to ensure you have the required information before you begin.
To enroll, you will need to know:
All Companies:
- Company legal name
- Employer identification number (also called a Federal Tax ID Number)
- Primary physical address from which your company will access E-Verify
- Mailing address (if different from the physical address)
- Hiring sites that will participate in E-Verify in each state
- Total number of current employees
- Your company’s North American Industry Classification System (NAICS) code
- Contact information (name, phone number, email addresses) for your company’s Memorandum of Understanding (MOU) Signatory and Program Administrator
Federal Contractors Subject to the FAR E-Verify Clause
- Unique Entity Identifier (UEI)
 Each screen provides additional information simply by clicking any help text symbol.
Providing this information will help us to quickly verify your company. If you need additional guidance, email E- Verify support at E-Verify@uscis.dhs.gov.
2.2 Enrollment Process
When you enroll your company, you need to share some basic information and agree to follow the rules of E-Verify. You will enroll your company just once and, after you do, you can register yourself and others to use E-Verify. See the Enrollment Process – Overview below along with the explanation of each step in the process.
ENROLLMENT PROCESS OVERVIEW
- Visit Enrollment Website and Accept Terms.
- Designate an Enrollment Point of Contact
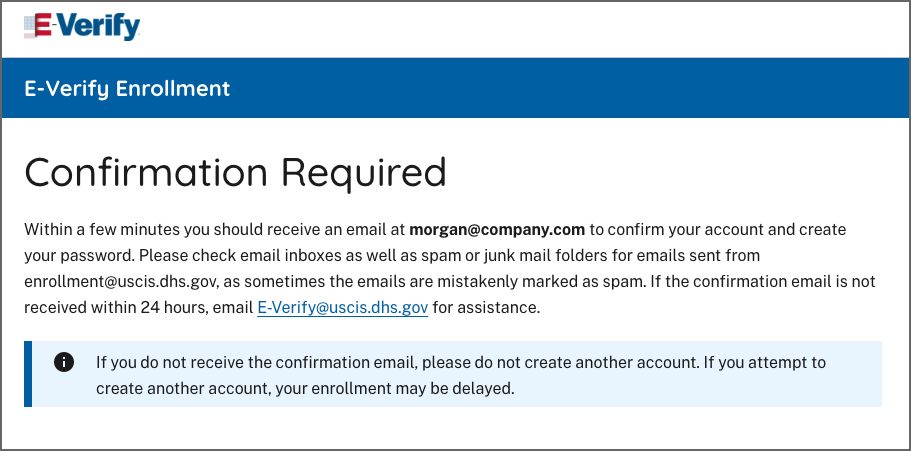
- Confirm email and click link with one-time code
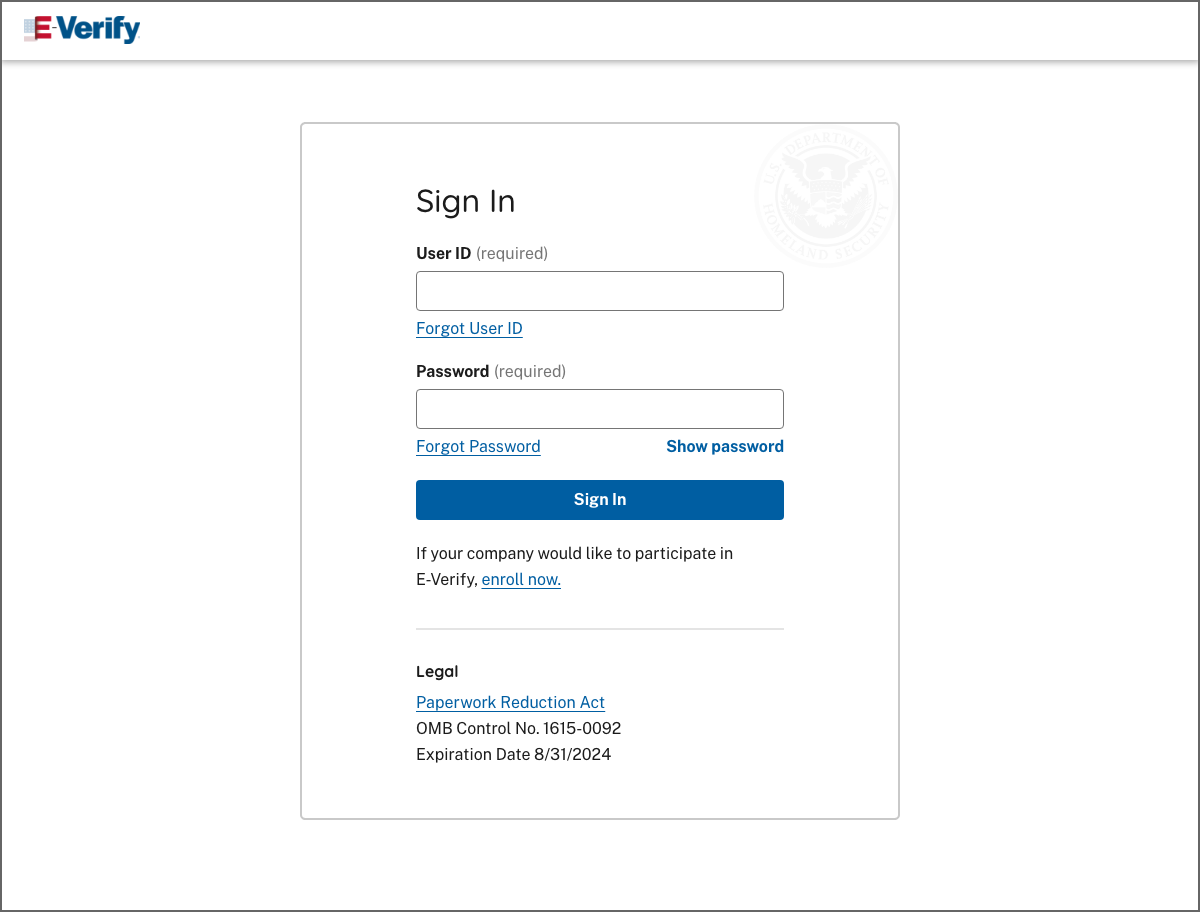
- Sign into E-Verify
- Review Enrollment Checklist
- Choose Account Access
- Choose Employer Category
- Enter Company Information
- Provide Company Addresses
- Provide Hiring Site Information
- Add MOU Signatory and E-Verify Users
- Review and Submit Information
- Save or print Signed Memorandum of Understanding (MOU)
- Visit Enrollment Website and Accept Terms.
You can enroll in E-Verify through the enrollment website. You must read and agree to the terms explained before you may continue. Then review the enrollment checklist and be sure you have all of the required information before you click "Begin E-Verify Enrollment."
- Designate an Enrollment Point of Contact
Your role is to enroll your company in E-Verify. You will be required to set up a temporary user account to complete the enrollment process.
- Confirm email and click link with one-time code
E-Verify gives you an opportunity to review your enrollment answers and to confirm that the access method selected fits your company's needs. If everything looks correct, click Next.
- Sign into E-Verify
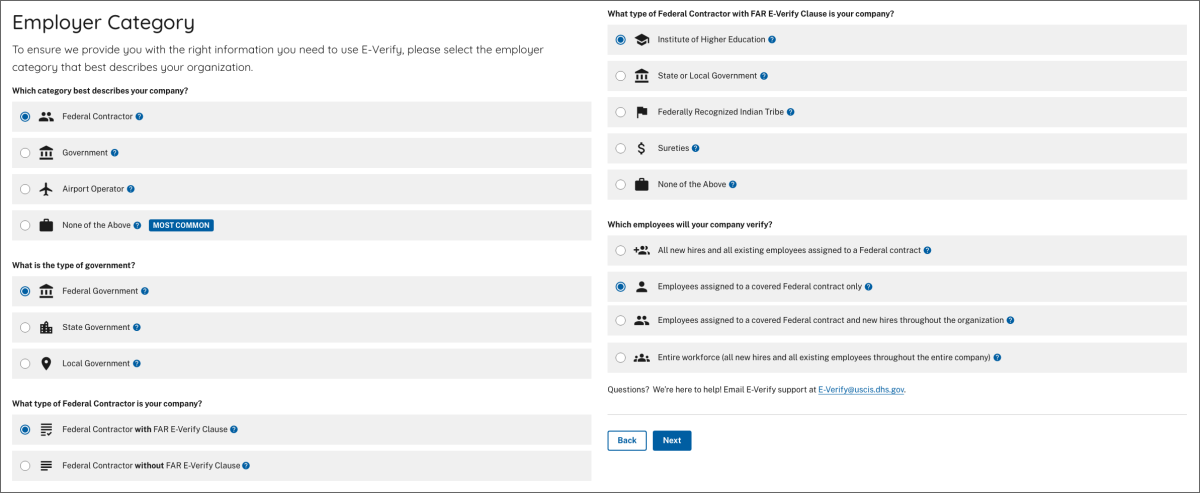
Certain types of organizations have unique E-Verify requirements so it's important for us to know if your company is a federal contractor with or without the Federal Acquisition Regulation (FAR) E-Verify clause or a federal, state or local government organization. If you select one of those categories, you may be asked additional questions related to that category. If none of those categories applies to your company, you should select 'None of these categories apply.'
For additional information on the FAR E-Verify clause, see the E-Verify Supplemental Guide for Federal Contractors found at www. E-Verify.gov.
You may change your organization designation at any time by updating your company profile in E-Verify.
- Review Enrollment Checklist
Review your company's obligations as explained in the MOU and indicate whether that you agree with the terms. You will be given the opportunity to download a copy of your electronically signed MOU at the end of the enrollment process.
- Choose Account Access
Enter the contact information of the person who electronically signed the MOU on the preceding page. You're also given the opportunity to designate this person as an E-Verify program administrator.
- Choose Employer Category
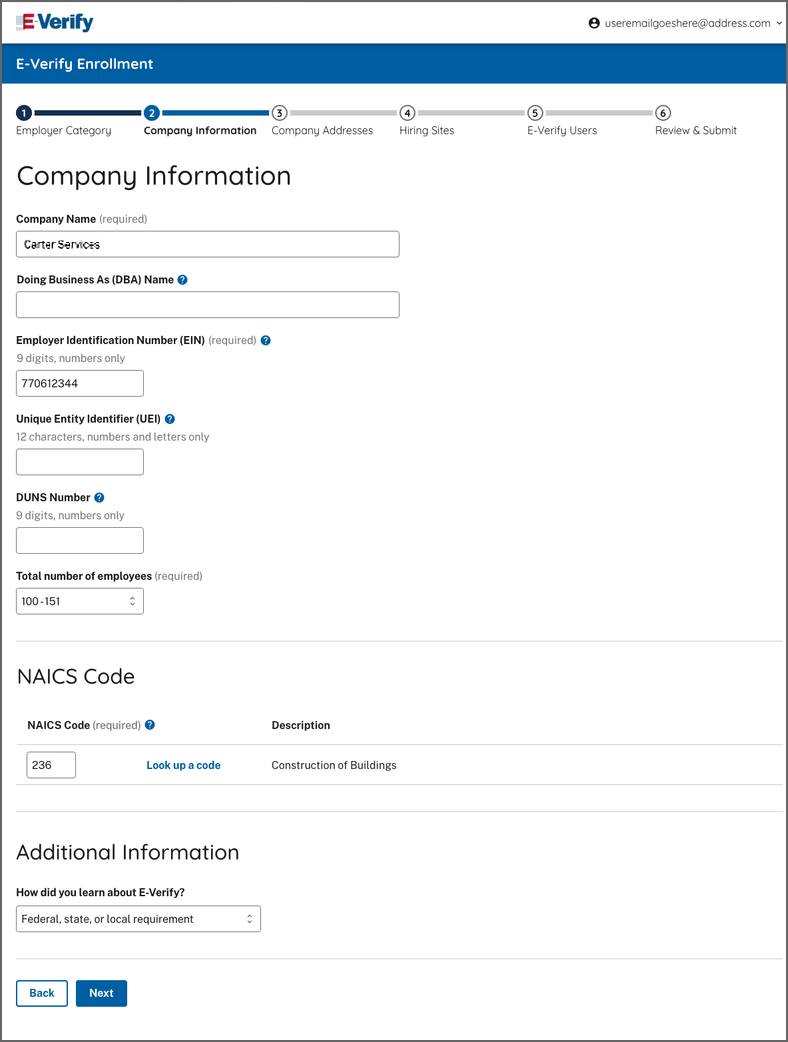
- Enter Company Information
Enter your company details, including your company's name, parent organization, physical verification location, mailing address, employer identification number and total number of employees. If you are enrolling your company in E-Verify employer access and you would like to link this account to an existing corporate administrator account, you may do so. Enter the first three digits of your company's NAICS code if you know it. If you do not know your company's NAICS code, you can leave the NAICS code field blank and click "Look Up a Code."
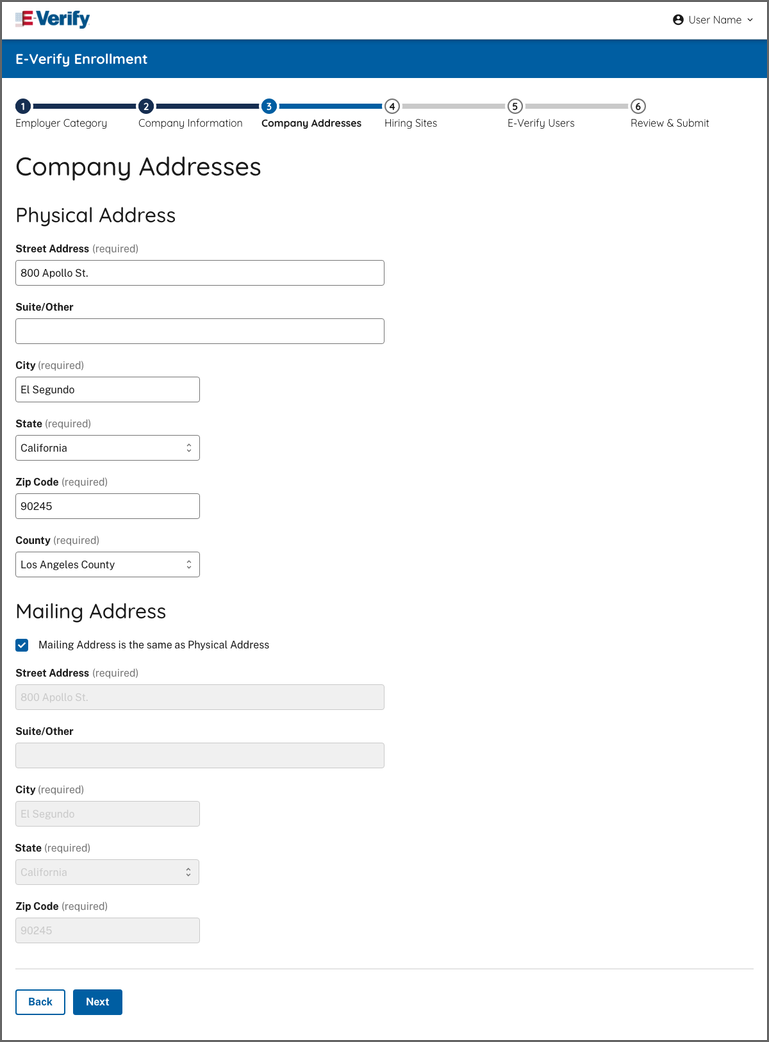
- Provide Company Addresses
-
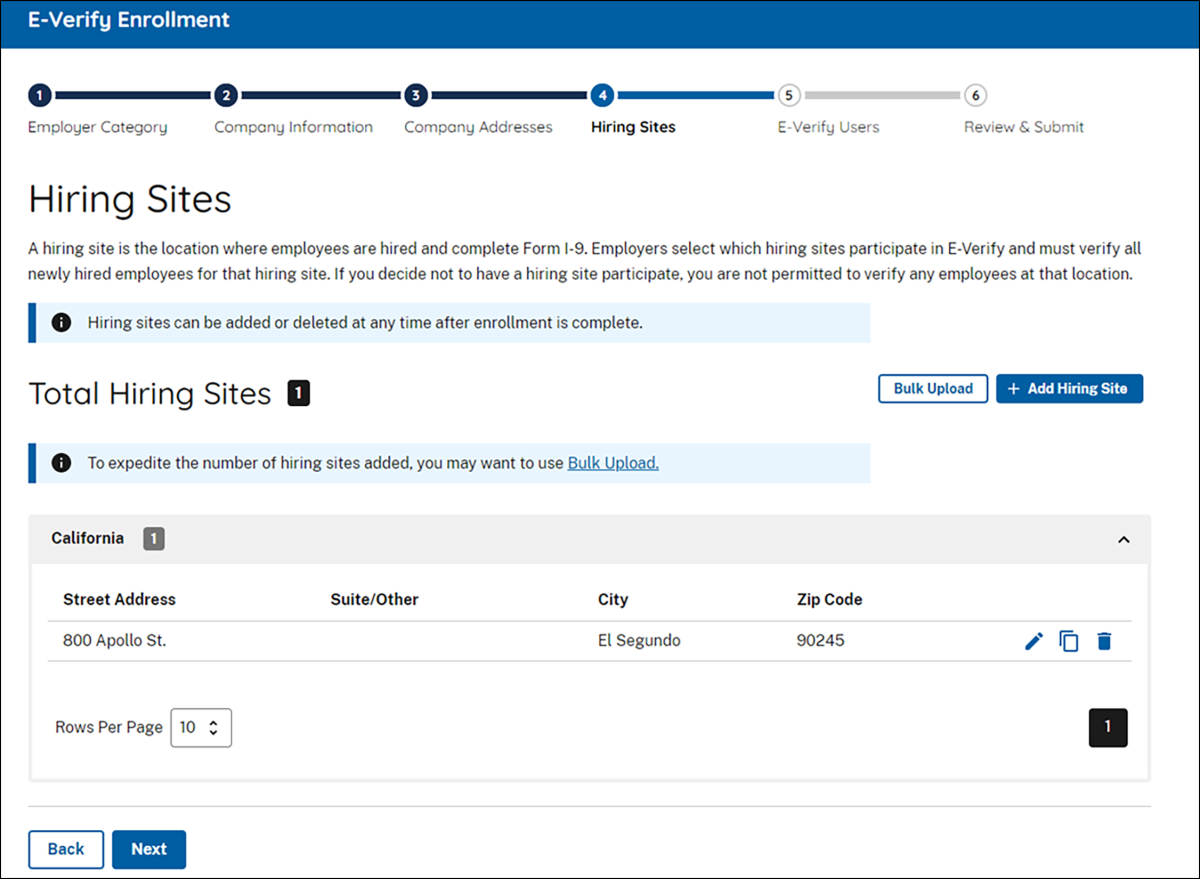
Add Hiring Site Location Information and Bulk Upload
The hiring site location is the physical address for each hiring site participating in E-Verify.-
Select + Add Hiring Site and enter the street address, city, state, and zip code and click Add Hiring Site to add your hiring sites one at a time.
-
Select the icons to add, edit, or delete a hiring site that will participate in E-Verify for each state.
OR -
Select Bulk Upload to add multiple hiring sites by uploading a file.
To use the bulk upload function, you must create a comma separated value (.csv) file with the hiring site addresses.-
If you need to create a .csv file, click Download CSV Template to open a pre-formatted .csv file. Add the hiring site addresses to the .csv file and save the document.
-
You also can drag the .csv file or click ‘choose from folder’ to locate the file and click Bulk Upload Hiring Sites.
-
-
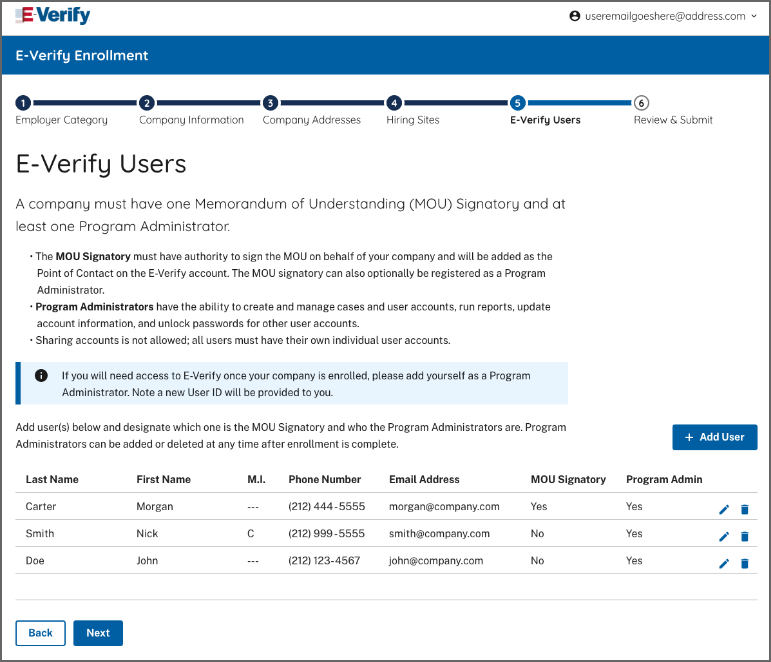
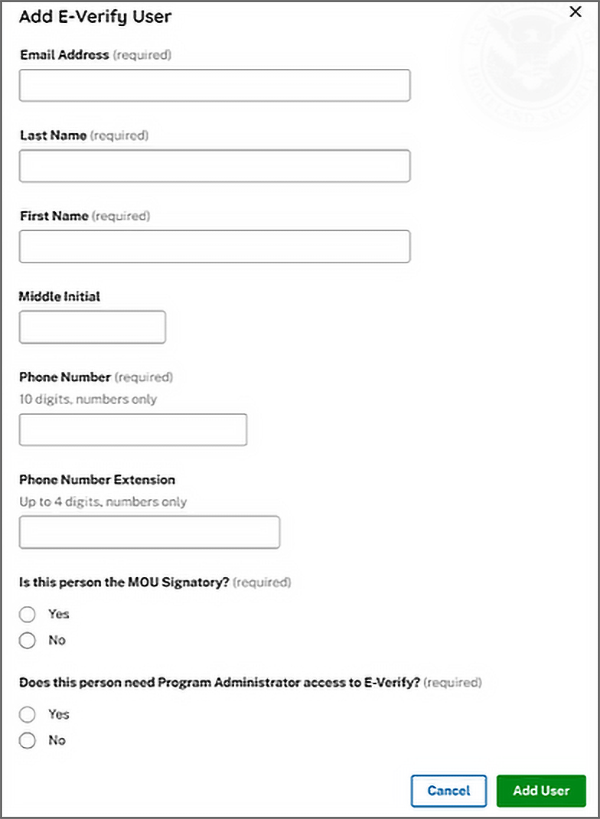
- Add MOU Signatory and E-Verify Users
During enrollment, you can register as many program administrators as you would like, however, you must register at least one. If you indicated earlier that your MOU signatory should also be a program administrator, that person is listed though you can choose to add more. After enrollment, your program administrator(s) can register general users and additional program administrators.
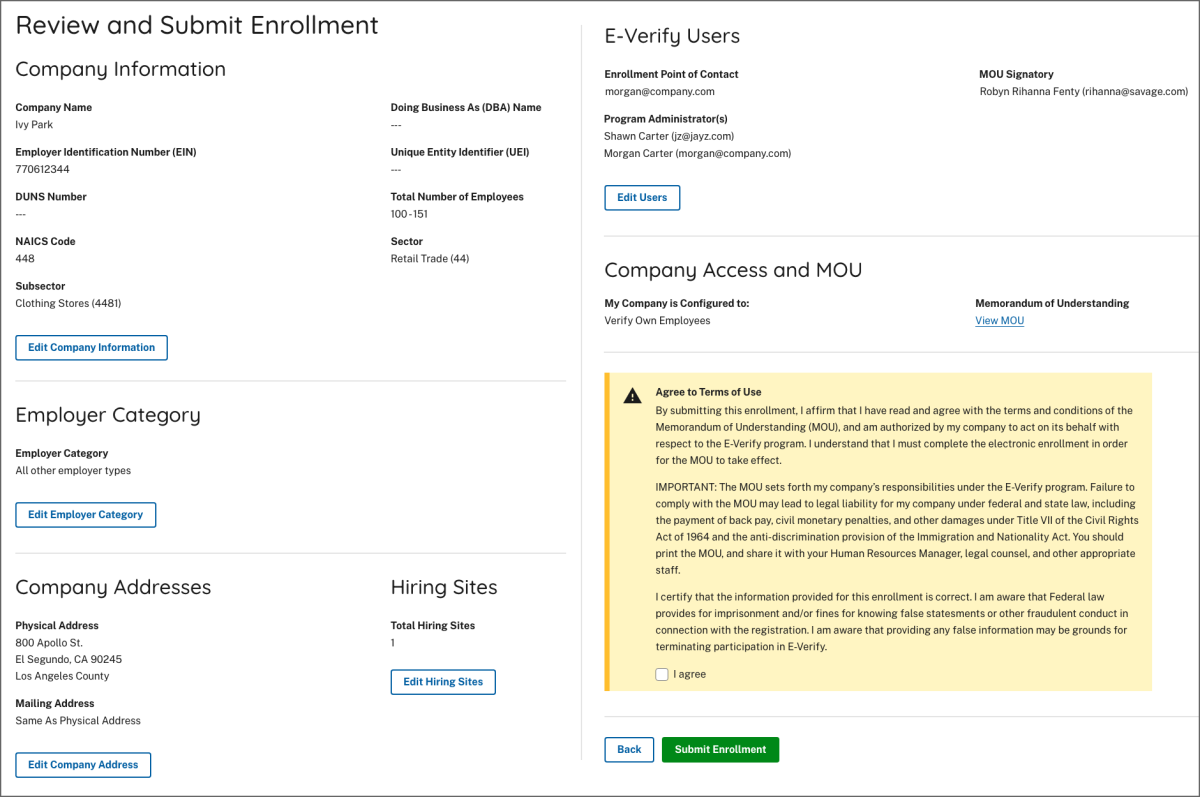
- Review and Submit Enrollment
The enrollment confirmation page confirms that we have received your enrollment information. Before you go, be sure to print a copy of the Memorandum of Understanding (MOU) you electronically signed. We recommend you share it with your human resources manager, legal counsel and other appropriate staff.
3.0 After Enrollment
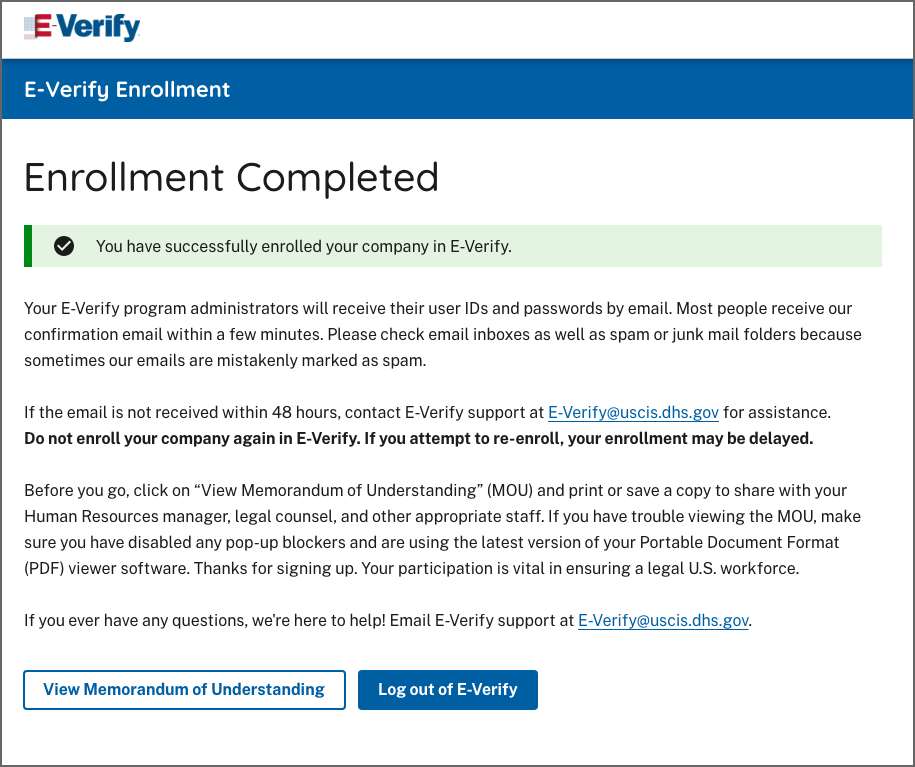
After you complete steps 1 through 12 of the enrollment process, E-Verify compares your company information with our list of companies already enrolled. E-Verify will approve your company’s enrollment and send confirmation e-mails to your company’s program administrator(s). Most people receive a confirmation e-mail within a few minutes. You should check your e-mail inbox as well as your spam or junk mail folders because e-mails may be mistakenly marked as spam. However, if your account is found to be a duplicate, the process may be delayed.
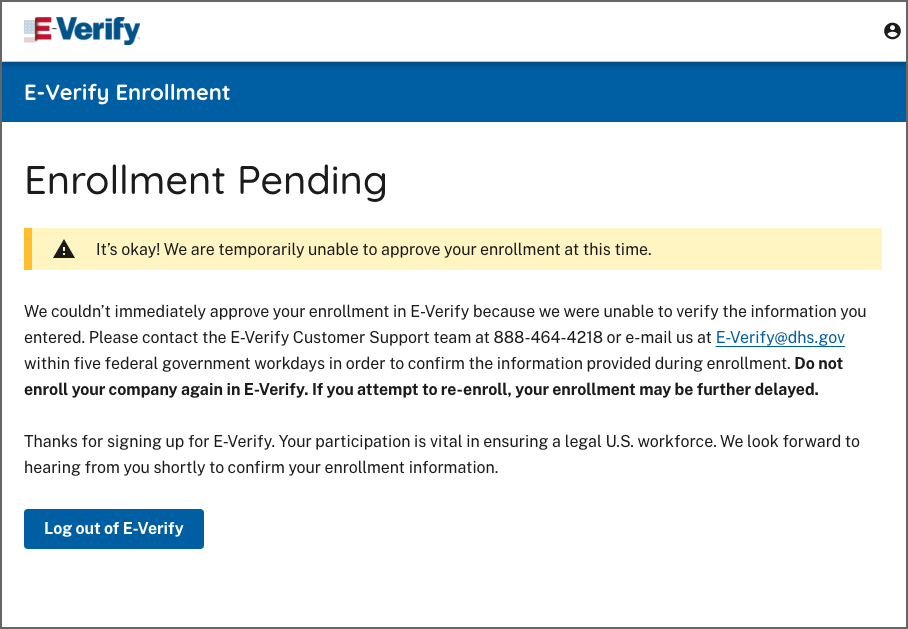
If we find your company is already enrolled, or if we need additional information to approve your company’s enrollment, we will send you that notification with instructions to contact the E-Verify Customer Support team at 888-464-4218 or email us at E-Verify@uscis.dhs.gov within five federal government working days in order to confirm the information provided during enrollment. Please do not try to re-enroll your company as it will further delay your enrollment.
Employers are required to clearly display the E-Verify Participation and Right to Work posters in English and Spanish. Employers may also display the posters in other languages provided by DHS.
E-Verify requires its participants to display the E-Verify Participation and Right to Work Notices in prominent locations clearly visible to prospective employees and all employees, including those hired to work in a remote setting. In order for employees, applicants and the public to have the most recent and complete information regarding E-Verify, employers should replace their participation posters when updates are provided by DHS. This can include displaying the posters digitally, online, in hard copy at physical locations, and providing a copy of the posters with job application materials.
E-Verify conducts account compliance activities to ensure proper use of E-Verify. It is important that you comply with all of the requirements you agreed to when you enrolled in E-Verify.
3.1 Enrollment Confirmation
After your company is approved for enrollment, each program administrator will receive a confirmation e-mail that contains a user ID, temporary password and the required next steps.
Note: If the Enrollment POC chooses to add themselves as a program administrator during enrollment, they will receive a new user ID and password for program administrator access.
Your program administrator must:
Log in to E-Verify with their user ID and temporary password (included in the E-Verify enrollment confirmation e-mail);
Change their password; and
Complete the E-Verify tutorial and pass the knowledge test.
Once a program administrator has completed these three steps, they will have full program administrator access to E-Verify.
3.2 Add New User
Only program administrators can register new E-Verify users. To add an additional user, the program administrator must provide the user’s name, phone number, fax number (optional) and e-mail address. For additional information on user registration, review the E-Verify User Manual located at www.E-Verify.gov.
4.0 E-Verify Resources And Contact Information
|
E-VERIFY RESOURCES |
URL |
|---|---|
|
E-Verify Public Website
|
|
|
E-Verify Enrollment Application
|
|
|
E-Verify Access for Employers and Corporate Administrators
|
|
|
E-Verify Access for E-Verify Employer Agents
|
E-VERIFY CONTACT INFORMATION
The E-Verify Contact Center is available to assist you with using E-Verify, password resets, cases and technical support. We can also answer your questions about E-Verify policies and procedures, Form I-9 and employment eligibility. We are available Monday through Friday, from 8:00 a.m. to 8:00 p.m. Eastern time, except when the federal government is closed. For users with hearing and speech impairment, TTY phone is available from 8:00 a.m. to 8:00 p.m. Eastern time.
Phone: 888-464-4218
Phone (TTY - For hearing and speech impaired users): 877-875-6028
Phone: 888-464-4218
Phone (TTY - For hearing and speech impaired users): 877-875-6028
Email: E-Verify@uscis.dhs.gov
U.S. Department of Justice, Civil Rights Division, Immigrant and Employee Rights Section (IER)
IER is available to answer your questions about immigration-related employment discrimination, including discrimination based on citizenship status, immigration status or national origin in the Form I-9 and E-Verify processes.
Equal Employment Opportunity Commission (EEOC)
EEOC is available to answer your questions about employment discrimination, including discrimination based on race, color, religion, sex (including pregnancy, gender identity, and sexual orientation), national origin, age (40 or older), disability, or genetic information.
Appendix A: Corporate Administrator Access
For companies that have multiple E-Verify employer accounts, E-Verify offers an account type called corporate administrator that enables companies to link together their employer accounts for reporting and oversight. This account type has no relation to how your company is organized (i.e., whether or not it is actually a chartered corporation).
Most companies do not need corporate administrator access regardless of whether they are corporations. Corporate administrator access requires more time and effort to set up than the usual employer access setup—so don’t enroll in corporate administrator access unless you are sure you need it. All corporate administrators must attend a training session offered over the Web instead of the self-paced online tutorial that is required of users registered to an employer account.
Unsure whether you need a corporate administrator account? Answer the following questions to determine if corporate administrator access is right for your company:
- Does your company have more than one location from which your E-Verify users will create and manage E-Verify cases?
- Does your company need each location to have its own employer account to keep its E-Verify users and cases separate from other locations?
Only if you answered yes to both questions should you enroll your company in corporate administrator access. You do not need corporate administrator access if you have multiple sites, but create and manage E-Verify cases from a single location. If you need help determining whether your company requires corporate administrator access, contact E-Verify Contact Center at 888-464-4218.
Example: John owns five copy centers in Kansas. Each copy center operates with a manager, and there is no central office. At each copy center, the manager completes a Form I-9 for every new employee and files it on site. John plans to have the copy center managers create the E-Verify cases for their own employees. In this example, each copy center is a verification location and a hiring site. In using E-Verify, John has two options.
Option 1 – Employer Access:
John’s first option is to enroll in E-Verify employer access and set up a single company account that will serve all of his copy centers. Although John has five verification locations, E-Verify permits users to enter only one verification location per company account. If John prefers a single company account, he must choose one copy center as his verification location in E-Verify, but can still create E-Verify cases at his other locations. During enrollment, John should indicate his company has five hiring sites. While this option offers John a simple setup and the need to sign just one memorandum of understanding (MOU), he will not be able to monitor usage on a location-by-location basis.
Option 2 – Corporate Administrator Access:
John’s second option is to enroll each copy center in E-Verify employer access and link them together with a corporate administrator account. A corporate administrator account will allow John to manage the accounts of each of his copy centers, but will not allow him to create E-Verify cases. John’s corporate administrator account does not require an MOU; however, he must electronically sign an MOU for each copy center enrolled in E-Verify employer access.